![]()
Beautiful Plants For Your Interior
I can’t tell you how many pet parents have asked me this while looking for the perfect Pet Portrait: “In the photo, she’s looking right at me. But in the portrait… the light’s just gone. Why?”
Here’s the thing—it’s almost never about whether it “looks like” them. The drawing skills matter, sure. But they’re only part of it.
What really makes or breaks the eyes? Material thickness. Structural depth. The tiny details in how it’s made. After years of doing custom pet portraits, I’ve learned that “soul” isn’t some abstract thing. Not on my workbench, anyway. It’s measurable. How thick is the acrylic? How deep is the carve? How many millimeters did I sink the eye socket? Exactly where does the highlight sit?
Miss by a hair, and it goes flat. Miss by another, and it goes dead.
Most of those lifeless portraits you see? They’re not from lazy artists. They’re from shortcuts in the making—key details stripped out because they’re invisible until it’s too late. You can’t see them in a product photo. You only feel them when you’re holding the piece and something just… isn’t right.
I often get asked, ‘How do you make the eyes look so realistic?’ The answer isn’t in the paint—it’s in the depth of the material.
People ask me all the time why I don’t do pet acrylic portraits on thin boards. The short answer? I’ve seen how those turn out.
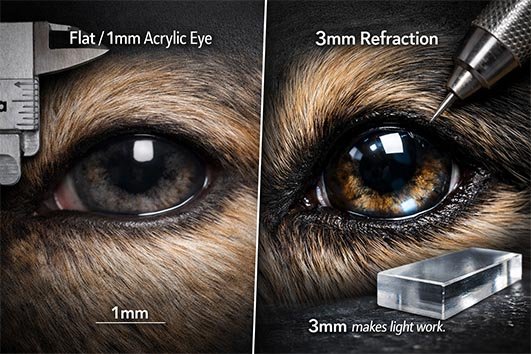
There’s this thing people do—they’ll print a pet portrait on 1mm acrylic, sometimes even thinner, and call it done. And the eyes? Flat. Completely flat. Like someone ironed them onto the surface. No depth, no light. Just… there.
I refuse to touch anything under 3mm. Why? Because physics doesn’t negotiate. At 3mm, you get the refraction; at 1mm, you get a flat sticker. It’s that simple
At 3mm, there’s enough room between the base layer and the final seal coat—and I use ASTM D5098 standard stuff for that—to let light actually do its job. It hits the surface, travels down, bends, and comes back up. That bending? That’s what pushes the color forward. Makes the eyes feel like they’re actually there, not just printed on.
Here’s what that means in practice: you’re working in that 3mm of space, using refraction to push the iris color up from within. That’s what creates the dimensional depth—the thing that makes people say the eyes follow you. It’s not a trick. It’s the physics behind why a handmade pet memorial art piece feels alive.
You really see the difference when the weather turns. Humidity goes over 60%, thin boards fog up. Every time. No buffer, so the seal coat just… fails. At 3mm, you’ve got room to breathe. The eyes stay clear. And they get that follow-you quality—the reason someone orders a custom pet portrait in the first place.
Depth makes light work. Light makes eyes that actually look at you.
When I’m working on 3D pet portraits or higher-end pet decor, I see a lot of people make the same mistake. They grab an X-Acto knife and figure if it works for fur, it works for eyes. Run it all the way through, one tool does everything.That’s how you spot an amateur.
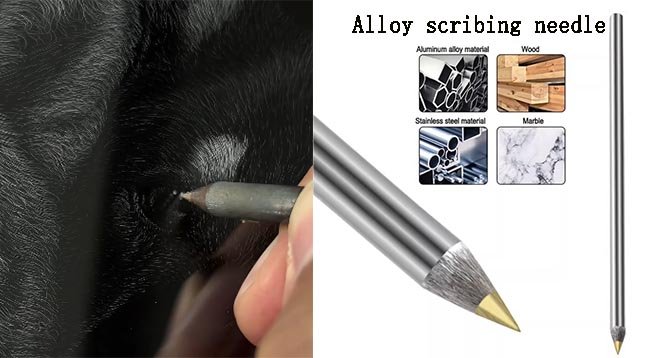
Look, for fur? Sure, a blade works fine. But eyes are different. An X-Acto’s edge is too straight. You can’t cut the kind of curve a pupil needs—that subtle arc that makes an eye look like an eye, not a dot.So for eyes, I use a tungsten carbide scribe. The tip hardness? HRA 90 or above. That’s significantly harder than most steels you’d run into. Hard enough to score precise lines on tile, glass, marble, metals—steel, aluminum, copper—even hard plastics. It holds an edge where other tools just slip.
The trick is pressure. With a single-point scribe, you’re pressing that 0.5mm micro-groove into the acrylic. Not deeper. Not shallower. It’s all feel. All the hours you’ve put in. Press too light and there’s no mark. Press too heavy and the acrylic cracks. There’s no machine doing this. Just you and the tool.
Here’s why I bother with this: only a scribe tip can create those tiny indentations that catch sidelight. Just a sliver of light, but that’s enough. On acrylic, those grooves mimic something you’d never expect from a piece of plastic—the wet film over a real eye. That tear film look. That’s what makes an eye read as alive.
When you hold one of these custom pet gifts, the eyes don’t sit on the surface. They’re in there. You can see depth. You can feel it.One more thing—when you’re using it, tilt the scribe about 45 degrees. Steady hand, even speed. That’s how you get clean lines. Straight and clean.
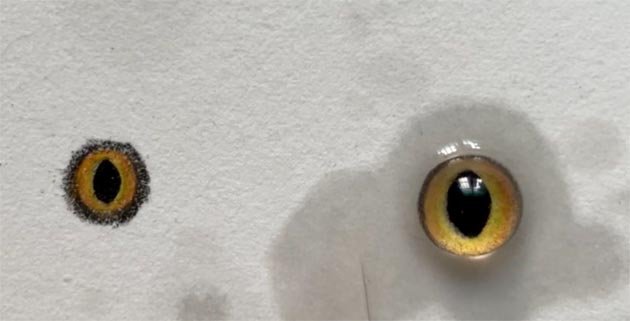
With felt pet portraits or 3D pet pieces, when the eyes look like they’re just stuck on, it’s usually because the work was too production-line. Didn’t account for what the material actually does.
So here’s how we handle eyes. First, we don’t use off-the-shelf factory eyes. We make them on the spot, for that specific animal, to get as close as possible. I use a jeweler’s caliper to draw the eye shape and pupil. Then soft pastels to blend in the exact iris color from the photo. Then UV glue to bond the pupil to the base. And here’s the important part: I measure the eye distance from the photo, match it 1:1 to the base, and mark it with an air-soluble pen before I start. That’s how you get the proportions right. That’s how it actually looks like your pet.
Now the real challenge.
Wool has give. Especially wool with higher lanolin content. You can needle it in 2mm deep, set the eye, come back the next morning—and it’s pushed back out. The wool springs. So the eye’s just sitting on the surface again.
So here’s what I do: around the edge of the eye, I don’t just needle. I crowd the wool. Push it inward, maybe 0.6 to 0.8mm. Force it in there.
This part? This is where I break needles. Constantly. But if you get that shadow crease right, the eye starts to look like it’s coming out of the wool, not sitting on top of it. It grows out of the face.
The ones who just glue on pre-made eyes? Those are toys. Not art.
Leather’s got a mind of its own. When you’re doing custom pet gifts, especially something that needs fine detail in the eyes, you’re fighting the fibers the whole way.
Here’s the thing about rotary knives. On leather, 0.7mm deep is your limit. Even our best guy in the studio—guy’s been doing this forever—he’s blown past it. Hit 0.9mm once, hit that loose fiber layer underneath, and that’s it. With veg-tanned leather, go too deep and you puncture through. Irreversible. Scrap.
So why bother with that thin line?
Because that depth—that 0.7mm cut—it holds something no printer can fake. That wet look. That quality where the eyes don’t sit on the surface but live inside the leather. It’s real physical depth. You layer the alcohol dye in there, one pass after another, and it starts to go translucent. Light goes in, bounces around from inside the leather, comes back out. That’s what makes an eye read as alive. Not printed. There.

Don’t look for an artist who talks about ‘soul’ in abstract terms. Look for the one who obsessively measures the humidity before opening a bottle of seal coat. That’s where the life of the portrait actually lives.