![]()
Beautiful Plants For Your Interior
I’ve seen so many crafters blame their wool when a needle felted cat looks like a literal brick. Honestly? I used to do the same. But after years of making custom animals, I realized the real culprit is almost never the wool — it’s the lack of a “soul” underneath.
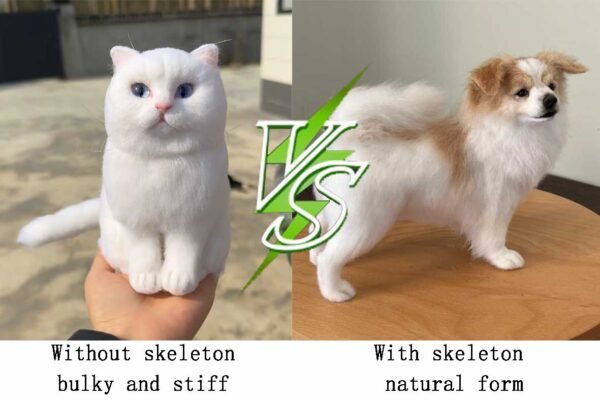
If your work feels lifeless, you’re probably skipping the skeleton. True artistry in needle felting started for me when I stopped obsessing over the fluff and started looking at the architecture inside. An aluminum wire armature is what quietly turns a static model into something that feels alive. This is the foundation of how to do needle felting at a professional level.
A needle felted cat can have beautiful surface details and still look oddly dead from the side. I’ve made pieces like that before — technically clean, but emotionally flat. This is the moment many artists hit a wall when trying to create lifelike custom animals. It’s frustrating to spend hours needlefelting, only to realize the pose looks like a museum specimen instead of a living creature.
I used to think my needle felting technique was the problem. Nope. Turns out, the issue wasn’t my stabbing skill at all. Solid wool simply has no posture. As it gets heavier, gravity slowly flattens your pose. This is why many tutorials on how to do needle felting focus on shaping wool but ignore the internal engineering needed for real life.
Most beginners start their first project by poking a big pile of wool. I call this the “wool ball trap.” I spent a lot of time doing this when I first started my work, and god, it was frustrating. A needle felted cat made this way has no real support. It feels like a soft pillow in your hands.
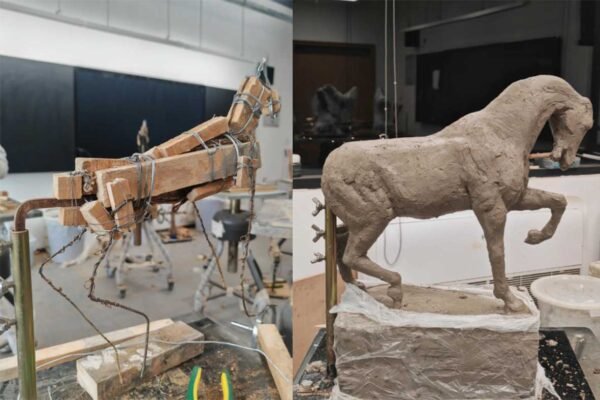
If you want to make custom animals that actually look real, you have to change your brain. Wool is just too soft. It cannot hold a heavy pose. My art major is in design, so I’m always thinking about how things stay up. I actually went and talked to my friends in the sculpture department to fix my stiff models. I watched them work on a horse and realized they used wood and thick wire to make the core strong. This was my big “aha” moment. Now, I never touch wool until my skeleton is perfect. This is how you master needlefelting—you build the bones first.
Using a skeleton was a huge jump in my art. Now, I try to see the body from the inside. This change makes me feel much more sure of myself when I make custom animals.
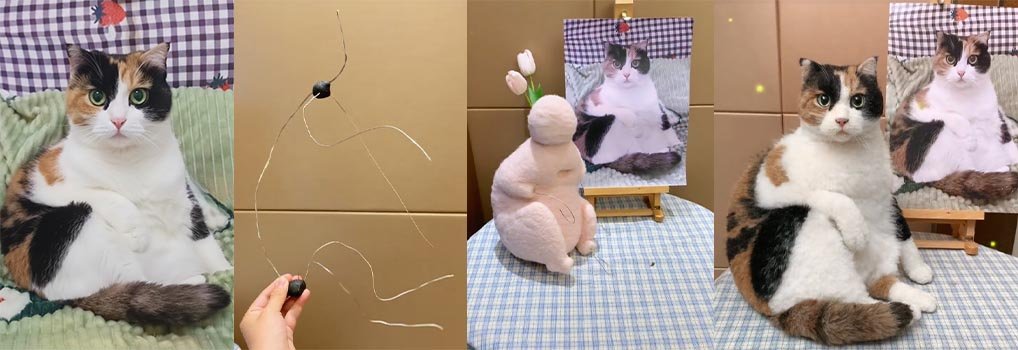
I have wasted so much money on the wrong wires. Jack Richeson Armature Wire 1/16 is my absolute favorite for small needlefelting projects. It’s a soft aluminum that doesn’t fight back. For bigger parts, I grab Steadline 3mm aluminum wire. But I learned a bloody lesson with 3-5mm Galvanised Steel Wire Rope. It’s so stiff it makes my hands ache, and those sharp ends made me bleed more than once. Choosing the right wire is a huge part of how to do needle felting without hurting yourself. It’s where you stop making toys and start creating life.
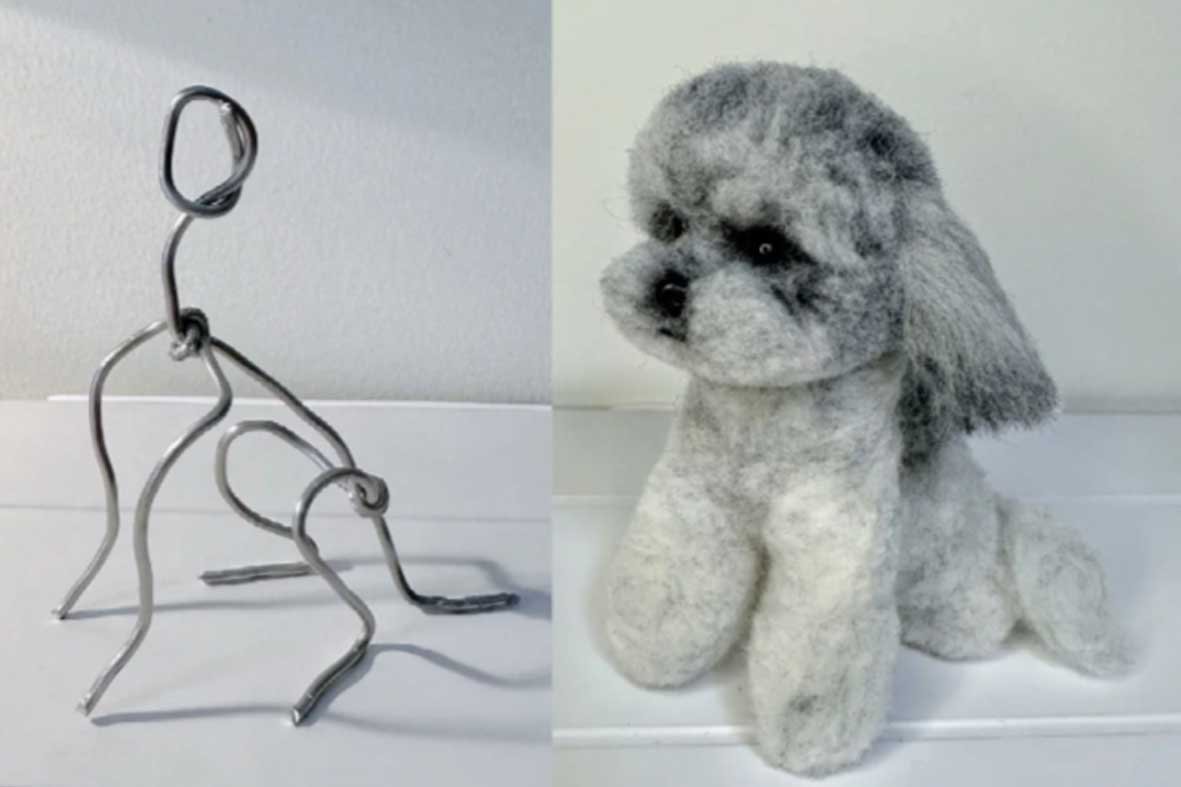
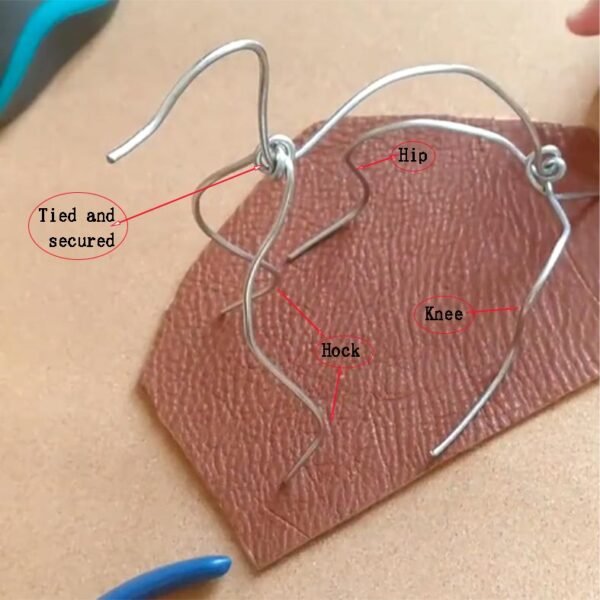
Please, do not use a single straight wire for the legs. That is the biggest mistake I see. A real cat is all joints. If you use a straight line, your needle felted cat will look like a stiff table. You must twist the wire at the shoulder. For the front legs, you need a real “Z” shape. For the hind legs, you have to find the hip, the knee, and the hock.
For a cat around 15-20cm, 1.5mm to 2.0mm aluminum wire is the “golden thickness.” It stays hidden but holds the weight. Most beginners end up with a dead “felt ball” because they forget that wool has weight. In needle felting, you have to wrap each joint tightly with thin wire or tape. If a joint is loose, it will be the first thing to fail when you start poking. A strong skeleton is what keeps custom animals alive.
Once the pose is right, needlefelting becomes a real anatomical sculpture. This is where you add the “meat.” My biggest tip? Do not use smooth top wool for the muscle layer. It’s too slippery and will just slide around the wire, which is maddening.
Instead, grab Core Wool with those short, curly fibers. It sticks to the metal like glue. This helps you build the shape of your needle felted cat much faster. When I wrap the legs, I pull it tight to create a hard base that feels like real muscle. But be careful: keep the wool thin at the joints. If you add too much, the knees will look like “fat tubes.” You want your custom animals to look lean and powerful.
This method unlocks the true potential of custom animals. When a client sends me photos, I don’t look at the fur first. I treat those photos like blueprints. I study the personality—the tilt of the head, the curve of the tail. I build that character directly into the skeleton.
This is key for owners whose pets have gone over the crossing the rainbow bridge. They don’t want a generic doll; they want to see that one special look. If the wire frame is right, the “spirit” of the needle felted cat is already there. That is the true goal of how to do needle felting.
Next time you start needle felting, stop. Don’t grab the wool yet. Spend one more hour on that skeleton. The moment you feel the frame “finding its natural pose,” you’ll see. You’ll understand why your needle felted cat suddenly feels like it’s alive.
A1: The internal armature is designed to give your pet its lifelike posture and anatomical structure. While it allows for very slight, gentle micro-adjustments (like a tiny tilt of the head to catch the light), we strongly recommend against frequent or forceful repositioning. The internal wires vary in thickness to mimic real bone structure, and excessive force may cause “internal misalignment” or shifting of the joints. To keep your pet in its most beautiful state, it is best to find its perfect pose and then let it rest.
A2: Because needle felting is a delicate fiber art, it is sensitive to dust and repeated handling. To ensure your memorial piece stays as perfect as the day it arrived, we highly recommend displaying it inside the premium acrylic display case provided with your order. This not only offers a 360-degree view of the craftsmanship but also creates a safe, dust-free environment that preserves the soft texture of the wool for years to come.
A3: It is built with a professional armature and high-density felting, so it is structurally sound. However, it is a “soft sculpture” intended for display rather than a toy. For owners who are new to fiber arts, we suggest handling it as little as possible. Lifting it gently by the base or body is fine, but avoid pressing down on the limbs or pulling the fur. This ensures that the “spirit” I’ve captured—especially for pets who have crossed the rainbow bridge—remains undisturbed and beautiful forever.